

A fence gate might look simple, but getting it to swing smoothly, latch cleanly, and stay aligned over time depends on choices you make before you drive the first screw. Proper gate installation starts with understanding clearances, stops, and adjustment methods so the gate works now and keeps working after wood swells, metal expands, or posts shift. Many gates fail because installers skip the measuring step, ignore load paths, or pick hardware that doesn’t match the weight and material.
This guide walks through the geometry that keeps a gate square, the clearances you need for different materials and climates, and the adjustment tools that let you correct drift without rehanging everything. You’ll learn how stops protect your latch from absorbing impact, how hinges affect long-term alignment, and what happens when you combine wood frames with metal posts or the other way around.
Whether you’re hanging a single walk gate or a set of driveway gates, the same principles apply. You’ll also see patterns that emerge across thousands of gate installations at Fence Specialties LLC in Riverside, California, where contractors and builders pick hardware based on what survives real-world use in different regions and climates.
Defining Gate Geometry And Structural Loads
Gate performance depends on precise geometry and understanding how weight transfers through the frame to the posts. Proper anchoring, span calculations, and load distribution prevent sagging and misalignment over time.
Hinge-Side Post Anchoring Requirements
The hinge post carries the entire weight of the gate frame plus dynamic loads from opening and closing. You must dig post holes deeper and wider for hinge posts than typical fence posts. A minimum depth of 30–36 inches works for most walk gates, but increase to 42–48 inches for wide or heavy gates and in frost-prone areas.
Use a post hole digger to create a bell-shaped bottom that widens 2–3 inches below the main shaft. Add 6 inches of gravel for drainage before setting the post. This base prevents frost heave and water damage that cause post movement.
The hinge post should be 6×6 wood, steel pipe, or reinforced composite for gates over 4 feet wide or 80 pounds. Mix concrete properly and pack it firmly around the post, sloping the top away from wood to shed water. Brace the post plumb in both directions until the concrete mix cures for at least 48 hours.
Span Width, Weight, And Sag Mechanics
Gate sag occurs when weight pulls the latch-side corner downward over time. The longer the span and heavier the fence gate, the greater the bending moment at the hinges. A 36-inch wood gate typically weighs 40–60 pounds, while a 6-foot double gate leaf can exceed 120 pounds.
Weight factors:
- Frame material (wood, steel, aluminum, vinyl)
- Infill density (solid boards, pickets, or open rail)
- Hardware and accessories (closer, lock, decorative elements)
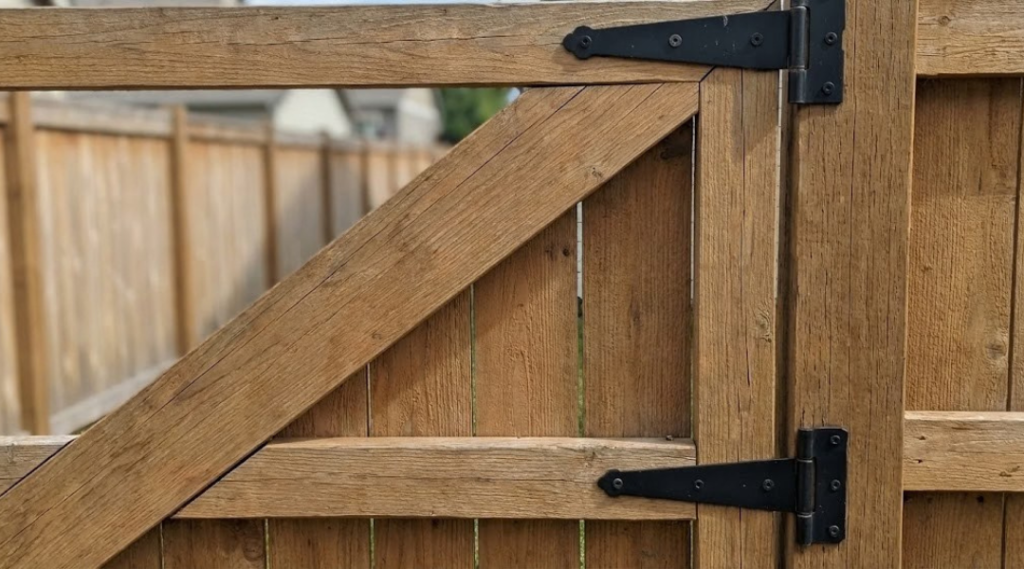
Install a diagonal brace from the bottom hinge corner to the top latch corner. This puts the brace in compression and transfers weight back toward the hinge post. Use an anti-sag cable with turnbuckle for ongoing adjustment on wood gates. Calculate total gate weight before selecting hinges; undersized hardware accelerates sag and hinge failure.
Single Versus Double Gate Dynamics
Single gates concentrate all structural loads on one hinge post and swing the full span width. Double gates split the load across two hinge posts and reduce the swing radius of each leaf by half. For openings over 5 feet, double gates improve stability and reduce post stress.
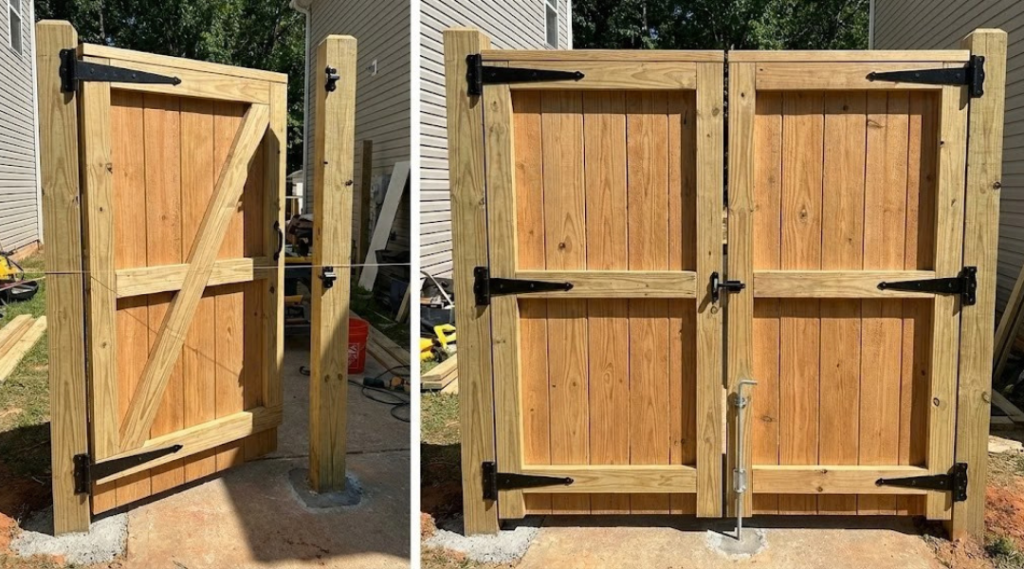
Double gates require a center stop, drop rod, or cane bolt to lock one leaf in place while the active leaf opens and closes. Each leaf should weigh no more than 100–120 pounds to prevent excessive hinge wear. Set posts in concrete with the same depth and care as single-gate hinge posts.
Align both posts perfectly plumb and parallel using a string line before the concrete sets. Even small misalignment creates binding, uneven gaps, or latch problems. Double gates also need coordination hardware like flush bolts or astragals where leaves meet to prevent warping or light gaps.
Clearances, Stops, And Movement Allowance
Gates need proper spacing and control mechanisms to function correctly over time. Wood and metal both respond to temperature changes, while ground conditions affect how gates align with their posts and the terrain below.
Ground Clearance Across Grade Changes
You should leave a gap of 2 to 4 inches between the bottom of your gate and the ground on level surfaces. This prevents dragging when you open the gate and accounts for minor ground shifts.
For sloped yards, you have two installation options. You can build the gate level across the bottom and increase the clearance on the downhill side to ensure smooth operation. Or you can rack the gate to follow the slope, which maintains a consistent gap but requires angled cuts on the gate frame.
Clay and sandy soils expand and contract with moisture and temperature changes. This movement can tilt fence posts over time. Adding extra clearance of 1 to 2 inches above your minimum helps compensate for potential post movement without requiring immediate adjustments.
Latch-Side Gaps And Thermal Expansion
The latch side of your gate requires a gap of 3/4 inch to 1 inch between the gate edge and the post. This spacing prevents the top corner from hitting the post when you close the gate.
Wood expands in humid conditions and contracts in dry weather. Metal gate hardware experiences similar changes with temperature fluctuations. The latch-side gap accommodates these movements without binding.
Hinge-side gaps vary based on your gate hinges type. Strap hinges typically need no gap, while barrel hinges require up to 3/4 inch. When installing a gate kit, check the manufacturer’s specifications for hinge clearance requirements. Secure all hinges with lag screws sized appropriately for your post material.
Stops, Catches, And Swing Limitation Logic
A gate stop controls how far your gate swings and prevents damage to hinges and latches. You can install stops on the ground using a metal or rubber device, or attach them directly to the fence post at the gate’s closed position.
Ground-mounted stops work well for heavy gates but may shift over time. Post-mounted stops provide more stability and work with most gate hardware configurations. Install the stop so the gate rests against it without gaps when fully closed.
For gates that swing both directions, install stops on both sides to limit travel. Adjust stop positions after installation to ensure the gate latches properly without forcing the gate hardware components.
Adjustment Mechanisms And Long-Term Stability
Gates shift over time due to wood movement, post settling, and hinge wear. Adjustment mechanisms let you correct alignment without removing hardware or rebuilding the frame. Understanding how these systems work helps you maintain smooth operation for years.
Hinge Tension And Vertical Correction
Adjustable gate hinges use set screws or slotted mounting plates to raise or lower the gate after installation. If your gate starts to drag on the ground, you can loosen the hinge bolts and slide the mounting bracket upward on the post by 1/4 to 1/2 inch. The wide bracket typically mounts on the post for vertical adjustment, while the narrow bracket attaches to the gate for horizontal positioning.
Check hinge tension every six months by opening and closing the gate several times. A properly tensioned hinge should hold the gate in any position without drifting. If the gate swings open or closed on its own, tighten the pivot pin or adjust the spring tension mechanism. For heavy gates over 100 pounds, you may need to add a third hinge to distribute weight more evenly and reduce strain on adjustment hardware.
Post Settlement And Realignment Limits
Fence posts can settle 1 to 2 inches during the first year after installation, especially in clay or sandy soil. This movement changes the relationship between the post and the gate frame. Adjustable hinges can compensate for up to 3/4 inch of vertical movement and 1/2 inch of horizontal shift before you need to reset the post.
When you hang the gate, leave a 1/2 to 3/4-inch gap between the latch post and gate frame. This clearance allows for minor post movement without binding. If settlement exceeds these limits, you’ll need to dig out the post, reposition it, and pack fresh concrete around the base.
When Hardware Compensates For Frame Distortion
Wood gates naturally warp and twist as lumber absorbs and releases moisture throughout the seasons. Adjustable gate systems with diagonal bracing can flex slightly to accommodate frame distortion up to 1 inch without losing structural integrity. When you attach hinges to a distorted frame, the adjustment slots let you align the gate plane with the fence line even if the frame itself isn’t perfectly square.
Metal adjustment brackets work better than fixed hinges for sagging gates because they redistribute stress across multiple mounting points. The brackets should fasten to solid wood with lag screws at least 3 inches long to prevent pullout when the frame twists.
Material-Specific Alignment Tradeoffs
Each gate material responds differently to environmental conditions and installation stress. Wood expands and contracts with moisture, vinyl stays rigid but relies heavily on brackets, and metal gates require careful weight management across hinges.
Wood Movement And Moisture Response
Wood gates shift throughout the year as humidity changes. During wet seasons, the wood absorbs moisture and expands. In dry periods, it shrinks back down.
You need to leave a 1/4 to 1/2 inch gap between the gate edge and the latch post. This clearance prevents binding when the wood swells. Without this space, your gate will stick and drag against the post.
The frame joints on wood gates loosen over time as the material moves. You should check diagonal measurements every few months to catch sagging early. Install a diagonal brace from the top hinge corner to the bottom latch corner for support.
Cedar and pressure-treated pine handle moisture better than untreated wood. Apply a waterproof sealant to all surfaces, including cut ends, before installation. Reseal annually to maintain protection against moisture damage.
Vinyl Rigidity And Bracket Constraints
Vinyl gates do not flex like wood or bend like metal. The material stays rigid in its installed position, which makes bracket placement critical from the start.
You cannot adjust vinyl gates much after installation. The brackets and hinges must be positioned exactly right the first time. Use shims during installation to fine-tune alignment before securing hardware permanently.
Reinforce wider vinyl gates with aluminum or steel inserts inside the frame rails. Gates over 4 feet wide sag without internal support. The reinforcement prevents drooping while maintaining the vinyl appearance.
Temperature affects vinyl differently than moisture. The material expands slightly in heat and contracts in cold. Leave small gaps at connection points to allow for this movement without stressing the brackets.
Steel And Aluminum Weight Distribution
Metal gates concentrate significant weight on the hinge-side post. Steel gates weigh more than aluminum but both need proper support to prevent post leaning.
Weight comparison by material:
| Gate Size | Steel Weight | Aluminum Weight |
|---|---|---|
| 4′ x 4′ | 45-60 lbs | 20-30 lbs |
| 4′ x 6′ | 70-90 lbs | 35-45 lbs |
Install hinges with the top hinge carrying 60% of the gate weight and the bottom hinge supporting 40%. This distribution prevents the bottom hinge from bending under stress. Use three hinges on gates taller than 5 feet.
Check metal gate posts for vertical alignment after concrete cures but before hanging the gate. A post that leans even slightly will cause the gate to swing open or closed on its own. Metal posts need deeper concrete footings than wood posts due to the added weight load.
Gate Hardware Patterns Seen At Fence Specialties LLC In Riverside, California
Fence Specialties in Riverside stocks hardware based on what works in the local climate and what contractors order most often. Heavy-duty hinges dominate inventory, hardware compatibility spans multiple fence materials, and heat resistance matters more than in cooler regions.
Regional Demand For Heavy-Duty Hinges
You’ll find heavy-duty hinges make up most of the gate hardware inventory at Fence Specialties because Riverside contractors install larger, heavier gates than in many other markets. The area has many properties with wide driveways and commercial applications that need gates up to 16 feet wide.
Standard residential hinges fail quickly on these installations. The weight and daily use require hinges rated for at least 500 pounds.
Common hinge types in stock:
- Weld-on hinges for metal gates
- Bolt-through hinges for wood and vinyl
- Adjustable gate hinges for alignment fixes
- Self-closing spring hinges
Your gate will sag without proper weight rating. A 12-foot wood gate can weigh 300-400 pounds when you account for the frame and panels.
Stock Hardware Compatibility Across Materials
Fence Specialties keeps hardware that works across wood, vinyl, and aluminum systems because you often need to match existing fence materials. Your project might combine a vinyl fence with an aluminum gate, or you might add a metal gate to a wood fence line.
The brackets and latches in their inventory fit standard post sizes across all three materials. This means you don’t need specialized hardware for each fence type.
Most hinges and latches attach through universal mounting patterns. You can use the same bolt-through latches on 4×4 wood posts, vinyl posts with aluminum inserts, and metal gate frames. The fasteners change but the latch body stays the same.
Heat Exposure Effects In Riverside, California
Riverside summer temperatures regularly hit 100°F and higher, which affects what hardware performs well. Metal components expand in heat, and some finishes break down faster than they would in cooler climates.
You need to watch for rusty hardware sooner in Riverside because temperature swings create more condensation. Metal contracts at night when it cools, and moisture forms on the surface. This cycle happens almost daily from May through September.
Powder-coated and galvanized hardware lasts longer than basic painted finishes. The store stocks mostly galvanized steel and stainless steel options.
Black hardware absorbs more heat and can become too hot to touch during peak afternoon hours. You should consider this when choosing latches and handles that people will use frequently.